Coffee of the Day - Moon Pie (I'll drink their coffee until it's gone, but we no longer eat their treats. discovered that they sadly use palm oil in their products. insert sad face here....)
Happy Happy Easter to each and every one of you! well, at least those of you who celebrate the holiday, that is. ;) Happy Sunday to the rest of you. :) may your day be glorious whether you celebrate the holiday or not!!!
I want to share with you a project I made for our son's fiancee's family. I also made one that I gave to our neighbors.
I started with a cardboard cheese box, pained it several shades of green with acrylic paint, added cs grass, and then topped with some fabulous wooden veneer fencing pieces I found at JoAnn's. the fence pieces were distressed with Tim Holtz distress markers. various sizes of Prima flowers dotted with stickles were added to complete the little garden boxes.
This sure does say 'springtime,' doesn't it?! :)
Have a wonderful day! Jennifer
Showing posts with label project. Show all posts
Sunday, April 16, 2017
Happy Easter!
Labels:
altered,
Easter,
JoAnn's,
Prima,
project,
re-purpose,
stickles,
Tim Holtz,
wood veneer
Friday, January 20, 2017
Tugging on Your Heart Strings with a Candy Bar! :)
Coffee of the Day - no idea because I am on a train to Washington DC for the Women's March as this posts !!!! :)
Hello and Happy Friday! I am crossing my fingers that our friend, Blogger, does right by me and posts this as it is scheduled..... oh please, oh please, oh please! :)
I am headed to the Women's March and am so very excited! will tell all about it when I get back. but until then, I leave you with some fun for The Digi Bells blog hop. if you are hopping along, then you will have arrived here from LINDA's absolutely gorgeous blog. :) if at any point you ever get lost along the hop, just head over to The Digi Bell's blog for the complete list.
The cutey image we are all featuring is called "Heart Strings" and will soon be available in the store. I decided to make a cover for a candy bar and a matching card.
at Christmas the guys all received various Oreo cookie treats. Ryan happened to get this Oreo crunch bar, which was new on the market this year. it was a huge hit. well I received a text a few weeks letting me know that he had searched and searched all over the town where he goes to school looking for them, but couldn't find one anywhere. so I took to the internet in search of.... of course Mom came to the rescue!
I found a few for Ryan and also decided to decorate one for Tyler's fiance for Valentine's Day. she love love loves chocolate!
the red polka dot paper is from Michael's. the other papers are from the Prima Coquette digital collection. some vintage lace and buttons were used in addition to distressed seam binding from Zipper Stop. flowers are from Wild Orchid Crafts.
a heart doily and cute little pearlized bauble add some fun touches.
now off you go to the beautiful blog of KARINA! thanks so much for stopping by! :)
I'll be back on the 25th with my project for Elisabeth Bell's challenge world! another fabulous image of hers will be used, and you know you don't want to miss that. ;)
Hello and Happy Friday! I am crossing my fingers that our friend, Blogger, does right by me and posts this as it is scheduled..... oh please, oh please, oh please! :)
I am headed to the Women's March and am so very excited! will tell all about it when I get back. but until then, I leave you with some fun for The Digi Bells blog hop. if you are hopping along, then you will have arrived here from LINDA's absolutely gorgeous blog. :) if at any point you ever get lost along the hop, just head over to The Digi Bell's blog for the complete list.
The cutey image we are all featuring is called "Heart Strings" and will soon be available in the store. I decided to make a cover for a candy bar and a matching card.
at Christmas the guys all received various Oreo cookie treats. Ryan happened to get this Oreo crunch bar, which was new on the market this year. it was a huge hit. well I received a text a few weeks letting me know that he had searched and searched all over the town where he goes to school looking for them, but couldn't find one anywhere. so I took to the internet in search of.... of course Mom came to the rescue!
I found a few for Ryan and also decided to decorate one for Tyler's fiance for Valentine's Day. she love love loves chocolate!
the red polka dot paper is from Michael's. the other papers are from the Prima Coquette digital collection. some vintage lace and buttons were used in addition to distressed seam binding from Zipper Stop. flowers are from Wild Orchid Crafts.
a heart doily and cute little pearlized bauble add some fun touches.
now off you go to the beautiful blog of KARINA! thanks so much for stopping by! :)
I'll be back on the 25th with my project for Elisabeth Bell's challenge world! another fabulous image of hers will be used, and you know you don't want to miss that. ;)
Friday, December 23, 2016
An Altered Bottle for GIU, but you have to keep it a secret!!! shhhh.......
Coffee of the Day - Black Nutty Fudge
oh so sad...... today is my final Growing in Unity (GIU) day..... I have had a wonderful time both making and sharing my projects with all of you! I hope you have enjoyed stopping by for your daily coffee and inspiration! :)
I've saved the biggest of my projects for last, but you have to keep it a secret. you see, this is a present for my husband and he can't see it before Christmas! ;) I tell ya, keeping him from seeing it as I was making it was a doozy! all of the layers took a while to dry, so keeping this in different places he wouldn't come across it was quite the challenge!
I started with an empty bottle of his favorite Rye whiskey. after first painting with a layer of gesso, I added at least 8 different layers of various colors of acrylic paint. I then lightly sanded the bottle to reveal the assorted layers underneath, at times sanding all the way down to the bare glass.
I then stamped leaves from the Layers of Life "Love Never Leaves" set all over the bottle with Prima chalk ink. I used the SU! ink squirty tool to spray ink droplets.
one side of the bottle is stamped with the "What the Buck" stamp. the other side is stamped with trees and the deer from the "...A Joyous Season" sentiment set.
seed pods and moss, in addition to mulberry flowers, decorate the bottle.
I also made clay leaves by stamping the leaves from the same Layers of Life "Love Never Leaves" set right into clay and then baking. small holes for hanging were made prior to baking.
distress crackle paint was applied once all of the other elements were added. I just love the way this ages and distresses any project! it is great on these altered bottles! :)
Thank you again for all of your lovely, encouraging comments this week! you have brought such joy into my heart, that is for certain!
be sure to leave a comment on any of my GIU posts for a chance to win your very own Unity grab bag of stamps!
I hope for you and yours a most blessed Christmas and Happy New Year! I'll be seeing you in 2017! may your days overflow with peace and joy! :)
Jennifer
Challenges:
Crafty Gals Corner - anything goes
Sunny Day - anything goes
Li'l Patch of Crafty Friends - anything goes
We Love to Create - anything mixed media goes
Crafting with an Attitude - anything goes
oh so sad...... today is my final Growing in Unity (GIU) day..... I have had a wonderful time both making and sharing my projects with all of you! I hope you have enjoyed stopping by for your daily coffee and inspiration! :)
I've saved the biggest of my projects for last, but you have to keep it a secret. you see, this is a present for my husband and he can't see it before Christmas! ;) I tell ya, keeping him from seeing it as I was making it was a doozy! all of the layers took a while to dry, so keeping this in different places he wouldn't come across it was quite the challenge!
I started with an empty bottle of his favorite Rye whiskey. after first painting with a layer of gesso, I added at least 8 different layers of various colors of acrylic paint. I then lightly sanded the bottle to reveal the assorted layers underneath, at times sanding all the way down to the bare glass.
I then stamped leaves from the Layers of Life "Love Never Leaves" set all over the bottle with Prima chalk ink. I used the SU! ink squirty tool to spray ink droplets.
one side of the bottle is stamped with the "What the Buck" stamp. the other side is stamped with trees and the deer from the "...A Joyous Season" sentiment set.
seed pods and moss, in addition to mulberry flowers, decorate the bottle.
I also made clay leaves by stamping the leaves from the same Layers of Life "Love Never Leaves" set right into clay and then baking. small holes for hanging were made prior to baking.
distress crackle paint was applied once all of the other elements were added. I just love the way this ages and distresses any project! it is great on these altered bottles! :)
Thank you again for all of your lovely, encouraging comments this week! you have brought such joy into my heart, that is for certain!
be sure to leave a comment on any of my GIU posts for a chance to win your very own Unity grab bag of stamps!
I hope for you and yours a most blessed Christmas and Happy New Year! I'll be seeing you in 2017! may your days overflow with peace and joy! :)
Jennifer
Challenges:
Crafty Gals Corner - anything goes
Sunny Day - anything goes
Li'l Patch of Crafty Friends - anything goes
We Love to Create - anything mixed media goes
Crafting with an Attitude - anything goes
Thursday, December 22, 2016
Hello Winter Hot Cocoa Canister for GIU
Coffee of the Day - Bourbon Pecan
Well we are in the final stretch for my Growing in Unity posts this week. y'all have been so nice to me and left such kind comments on my projects! thank you so very much! :)
Here in northeast Ohio, especially the area of the state where we live, it gets downright COLD in the winter. currently our temps are in the single digits or teens. lots of beautiful snow is on the ground, with quite a bit of ice mixed in.
that means in order to keep warm, you need a big cup of coffee or hot cocoa! for our wonderful neighbors, I made a canister of homemade hot cocoa mix using a fun assortment of Unity Stamps.
I started with a re-purposed Nestle Quick container (it's actually part of the cocoa recipe) and added digital papers from the Design by Dani Woodland Spring collection. it's funny that the papers aren't a Christmas collection at all, but rather a spring one. I just loved the colors, though, to match the canister lid. ;)
images from the "Hello Winter" stamp set by Susan Weckesser were stamped on Stampin' Up! natural white.
the cutey girl was stamped and then cut with a Tim Holtz stitched die. I also stamped the doily from the Layers of Life "Magical Bliss and Wonder" set after masking. the trees were added and then several little snowflakes from the same LoL set in kraft ink. more snow flakes were made with Viva Decor pearl drops. the flower center is dotted with distress stickles and the snow on the ground is created with stickles as well.
more snowflakes from the LoL set, also stamped on the same natural white cs, with dual shades of blue ink, were fussy cut and added to the canister.
gorgeous burlap and lace ribbon from Michael's wraps around the canister and ties in a bow.
a beautiful glitter snowflake, also from Michael's, acts as a lovely little backdrop to the precious girl image by Susan.
a doily sprayed with glimmer mist and tree cut with a Tim Holtz die help accent the canister. a few snowflake stickers, also from Michael's give the final decoration. normally I would have added buttons, but our neighbors have 2 adorable little girls under the age of 3 and I didn't want to chance a button coming off and presenting a choking hazard to either one of them.
tickets were cut from the "Ticket to Christmas" set and lightly painted. I love the way the inks ran together to create a vintage look! distress markers were used to accent.
the top is decorated with a beautiful velvet poinsettia, gold glitter dusted berries, a pretty bow made with ribbons from Really Reasonable Ribbon, snippet of same burlap and lace, and a little pinecone.
that does it for today's post! if you would like the recipe for my hot cocoa mix, head over to this post. the mix used in this canister uses hazelnut flavored creamer. you can use all different flavors for fun!
thanks so much for stopping by! don't forget to leave a comment on any of my GIU posts for your chance to win a Unity Stamps grab bag! :)
check back tomorrow for my final post.
Jennifer
p.s. a reminder that you can enlarge any photo on my blog simply by clicking on it. the picture will open in another window for you. :)
Challenges:
Sweet Stampers - anything goes
Scrap 'n Challenge - Christmas in white and blue
The Crazy Challenge - everything goes
Simon Says Stamp Wed - make it sparkle (lots of glitter and rhinestones in addition to the pearl drops)
Shopping Our Stash - Winter Wonderland
Kraftin' Kimmi's Wonderful Wed - anything goes
The Crafty Addicts - anything goes or Let it Snow
Craft-Dee Bow-Z - anything goes with a handmade bow
Well we are in the final stretch for my Growing in Unity posts this week. y'all have been so nice to me and left such kind comments on my projects! thank you so very much! :)
Here in northeast Ohio, especially the area of the state where we live, it gets downright COLD in the winter. currently our temps are in the single digits or teens. lots of beautiful snow is on the ground, with quite a bit of ice mixed in.
that means in order to keep warm, you need a big cup of coffee or hot cocoa! for our wonderful neighbors, I made a canister of homemade hot cocoa mix using a fun assortment of Unity Stamps.
I started with a re-purposed Nestle Quick container (it's actually part of the cocoa recipe) and added digital papers from the Design by Dani Woodland Spring collection. it's funny that the papers aren't a Christmas collection at all, but rather a spring one. I just loved the colors, though, to match the canister lid. ;)
images from the "Hello Winter" stamp set by Susan Weckesser were stamped on Stampin' Up! natural white.
the cutey girl was stamped and then cut with a Tim Holtz stitched die. I also stamped the doily from the Layers of Life "Magical Bliss and Wonder" set after masking. the trees were added and then several little snowflakes from the same LoL set in kraft ink. more snow flakes were made with Viva Decor pearl drops. the flower center is dotted with distress stickles and the snow on the ground is created with stickles as well.
more snowflakes from the LoL set, also stamped on the same natural white cs, with dual shades of blue ink, were fussy cut and added to the canister.
gorgeous burlap and lace ribbon from Michael's wraps around the canister and ties in a bow.
a beautiful glitter snowflake, also from Michael's, acts as a lovely little backdrop to the precious girl image by Susan.
a doily sprayed with glimmer mist and tree cut with a Tim Holtz die help accent the canister. a few snowflake stickers, also from Michael's give the final decoration. normally I would have added buttons, but our neighbors have 2 adorable little girls under the age of 3 and I didn't want to chance a button coming off and presenting a choking hazard to either one of them.
tickets were cut from the "Ticket to Christmas" set and lightly painted. I love the way the inks ran together to create a vintage look! distress markers were used to accent.
the top is decorated with a beautiful velvet poinsettia, gold glitter dusted berries, a pretty bow made with ribbons from Really Reasonable Ribbon, snippet of same burlap and lace, and a little pinecone.
that does it for today's post! if you would like the recipe for my hot cocoa mix, head over to this post. the mix used in this canister uses hazelnut flavored creamer. you can use all different flavors for fun!
thanks so much for stopping by! don't forget to leave a comment on any of my GIU posts for your chance to win a Unity Stamps grab bag! :)
check back tomorrow for my final post.
Jennifer
p.s. a reminder that you can enlarge any photo on my blog simply by clicking on it. the picture will open in another window for you. :)
Challenges:
Sweet Stampers - anything goes
Scrap 'n Challenge - Christmas in white and blue
The Crazy Challenge - everything goes
Simon Says Stamp Wed - make it sparkle (lots of glitter and rhinestones in addition to the pearl drops)
Shopping Our Stash - Winter Wonderland
Kraftin' Kimmi's Wonderful Wed - anything goes
The Crafty Addicts - anything goes or Let it Snow
Craft-Dee Bow-Z - anything goes with a handmade bow
Labels:
Christmas,
GIU,
glimmer mist,
Michael's,
project,
re-purpose,
Really Reasonable Ribbon,
stickles,
Tim Holtz,
Unity,
Viva Decor,
winter
Tuesday, December 20, 2016
Holiday Gift Ideas with GIU
Coffee of the Day - Eggnog
Welcome back for my second Growing in Unity (GIU) gal post. How's your holiday shopping going? have you finished? started? ;) my husband used to have a tradition of waiting until Christmas Eve to actually BEGIN his shopping! thankfully after 30 years of marriage, I can happily say that is no longer a tradition of his! grins! he likes to start in October or so like the most of us....
today I want to share with you a few somewhat 'quick' little ideas for gifts using Unity stamps. now bear in mind that quick for me might not be quick for you, I am a VERY slow crafter. I kinda like it that way, as it gives me plenty of time to think about the people I am making things for. once upon a time I could whip up a card in less than 10 minutes, but these days it takes me several hours just to paint my images. but it is sooooooooo relaxing! my cat, Moon Pie loves to come into my craft room with me, so it's really a special time. :)
now on to my gift ideas ~
first up is a tag I made to go on a candle that was sent to my Mother-in-law. if you have a Michael's craft store nearby, these jar candles are fabulous! every once in a while they go on sale 4/$10. otherwise I'll use my 40% off coupons on them. the fragrances are quite nice and even when I burn the candles all day long, they'll still last almost a week.
when my MIL came for a visit this spring, I hooked her on them, too. so I found one in a scent I knew she would like and added it along with some other goodies for her for Christmas.
the tag is made using the pretty "Peace Dove" image, stamped in versamark on one of the freebie tags that came along in the 'thank you' gift Unity sent in my last order. I then embossed it in copper ep, once that dried, I added some frantage powders and spritzes of a few shades of glimmer mist. touches of distressing to the tag's edges, a vintage holly sprig, and pretty ribbons turn this into a fabulous gift!
Next up are some cutey little gift bags that I also found at Michael's. These use a combination of stamp sets that might cause you to scratch your head at first, but they really look great together!
I stamped various snowflakes from the Layers of Life Magical Bliss and Wonder set in Prima chalk inks on the muslin bags as well as the little wooden tags my husband made. I then stamped the snowman from Susan Weckesser's "One of a Kind Winter" set using Staz-on. Tim Holtz distress markers were used to color it in, and the snow drops were made with a Viva Decor pearl pen.
several shades of glimmer mist was sprayed to add a bit of sparkly shine. poinsettias are from Hobby Lobby. finally, the 'joy' is from a sentiment from the "Joy to Go" set.
Thank you so much for stopping by for a cuppa with me! be sure to leave a comment on any one of my GIU posts this week for a chance to win a Unity grab bag of stamps! :)
Jennifer
Challenges:
Crafty Boots - Winter Wonderland (gift bags)
Love to Scrap - anything goes
Melonheadz - time for Christmas
Marker Pop - winter (gift bags, colored with Tim Holtz distress markers)
Use Your Stuff - Merry Christmas ( buttons, ribbons, twine, and Viva Decor pearl pen are all from my older stash)
Simon Says Stamp Wed Ch - gift it
Welcome back for my second Growing in Unity (GIU) gal post. How's your holiday shopping going? have you finished? started? ;) my husband used to have a tradition of waiting until Christmas Eve to actually BEGIN his shopping! thankfully after 30 years of marriage, I can happily say that is no longer a tradition of his! grins! he likes to start in October or so like the most of us....
today I want to share with you a few somewhat 'quick' little ideas for gifts using Unity stamps. now bear in mind that quick for me might not be quick for you, I am a VERY slow crafter. I kinda like it that way, as it gives me plenty of time to think about the people I am making things for. once upon a time I could whip up a card in less than 10 minutes, but these days it takes me several hours just to paint my images. but it is sooooooooo relaxing! my cat, Moon Pie loves to come into my craft room with me, so it's really a special time. :)
now on to my gift ideas ~
first up is a tag I made to go on a candle that was sent to my Mother-in-law. if you have a Michael's craft store nearby, these jar candles are fabulous! every once in a while they go on sale 4/$10. otherwise I'll use my 40% off coupons on them. the fragrances are quite nice and even when I burn the candles all day long, they'll still last almost a week.
when my MIL came for a visit this spring, I hooked her on them, too. so I found one in a scent I knew she would like and added it along with some other goodies for her for Christmas.
the tag is made using the pretty "Peace Dove" image, stamped in versamark on one of the freebie tags that came along in the 'thank you' gift Unity sent in my last order. I then embossed it in copper ep, once that dried, I added some frantage powders and spritzes of a few shades of glimmer mist. touches of distressing to the tag's edges, a vintage holly sprig, and pretty ribbons turn this into a fabulous gift!
Next up are some cutey little gift bags that I also found at Michael's. These use a combination of stamp sets that might cause you to scratch your head at first, but they really look great together!
I stamped various snowflakes from the Layers of Life Magical Bliss and Wonder set in Prima chalk inks on the muslin bags as well as the little wooden tags my husband made. I then stamped the snowman from Susan Weckesser's "One of a Kind Winter" set using Staz-on. Tim Holtz distress markers were used to color it in, and the snow drops were made with a Viva Decor pearl pen.
several shades of glimmer mist was sprayed to add a bit of sparkly shine. poinsettias are from Hobby Lobby. finally, the 'joy' is from a sentiment from the "Joy to Go" set.
Thank you so much for stopping by for a cuppa with me! be sure to leave a comment on any one of my GIU posts this week for a chance to win a Unity grab bag of stamps! :)
Jennifer
Challenges:
Crafty Boots - Winter Wonderland (gift bags)
Love to Scrap - anything goes
Melonheadz - time for Christmas
Marker Pop - winter (gift bags, colored with Tim Holtz distress markers)
Use Your Stuff - Merry Christmas ( buttons, ribbons, twine, and Viva Decor pearl pen are all from my older stash)
Simon Says Stamp Wed Ch - gift it
Labels:
Christmas,
frantage,
GIU,
glimmer mist,
Hobby Lobby,
Michael's,
Prima,
project,
Really Reasonable Ribbon,
tag,
Tim Holtz,
Unity,
Viva Decor
Friday, December 16, 2016
A Merry Hot Cocoa Canister
Coffee of the Day - Salted Caramel
Wooo Hooo! it's Friday! phew.... I am actually taking the day off from crafting once I finish typing up this post. and one of my treats for the day is making the journey into Starbuck's to celebrate! I am very excited about that, I tell you! the closest one to me is a 30 minute drive, so it's not often I am able to treat myself to one of their yummy coffees. today is the day though! :D
I'm sharing a fun project I have made for the family of my oldest son's fiance. yes, you read that correctly. I said FIANCE! Tyler and Danielle became engaged a few days ago! we are over the moon excited for the two of them!!!
last year I made a container of hot cocoa mix for Danielle's family and they all loved it so much. they asked for more of the mix, in fact, before winter was over. so I thought I would make more for them this Christmas, but wanted to create a different type of container to hold it, so I have re-purposed a coffee can.
I used digital papers and elements from the Bo Bunny Father Christmas collection with the exception of the stripe base paper which is from Michael's.
all buttons are from my stash, as is the wonderful rustic plaid ribbon.
pretty red polka dot ribbon at the top is from Really Reasonable Ribbon.
snowflake die is by Sizzix. the pretty Christmas pick on top is also from Michael's.
thanks so much for stopping by! enjoy your day! :) I'll see you again tomorrow.
Jennifer
p.s. you can find the recipe for my hot cocoa mix here on this post. the mix I have made for today's container uses hazelnut flavored creamer. it smells simply divine! :)
Challenges:
Winter Coffee Lover's Blog hop
Alphabet Ch - use something red
Brown Sugar - red, green, and white
Craft for the Craic - anything but a Christmas card
Crafty Calendar - Christmas Time
Eclectic Ellapu - anything Christmas
Simon Says Stamp Wed Ch - gift it
Wooo Hooo! it's Friday! phew.... I am actually taking the day off from crafting once I finish typing up this post. and one of my treats for the day is making the journey into Starbuck's to celebrate! I am very excited about that, I tell you! the closest one to me is a 30 minute drive, so it's not often I am able to treat myself to one of their yummy coffees. today is the day though! :D
I'm sharing a fun project I have made for the family of my oldest son's fiance. yes, you read that correctly. I said FIANCE! Tyler and Danielle became engaged a few days ago! we are over the moon excited for the two of them!!!
last year I made a container of hot cocoa mix for Danielle's family and they all loved it so much. they asked for more of the mix, in fact, before winter was over. so I thought I would make more for them this Christmas, but wanted to create a different type of container to hold it, so I have re-purposed a coffee can.
I used digital papers and elements from the Bo Bunny Father Christmas collection with the exception of the stripe base paper which is from Michael's.
all buttons are from my stash, as is the wonderful rustic plaid ribbon.
pretty red polka dot ribbon at the top is from Really Reasonable Ribbon.
snowflake die is by Sizzix. the pretty Christmas pick on top is also from Michael's.
thanks so much for stopping by! enjoy your day! :) I'll see you again tomorrow.
Jennifer
p.s. you can find the recipe for my hot cocoa mix here on this post. the mix I have made for today's container uses hazelnut flavored creamer. it smells simply divine! :)
Challenges:
Winter Coffee Lover's Blog hop
Alphabet Ch - use something red
Brown Sugar - red, green, and white
Craft for the Craic - anything but a Christmas card
Crafty Calendar - Christmas Time
Eclectic Ellapu - anything Christmas
Simon Says Stamp Wed Ch - gift it
Labels:
Bo Bunny,
Christmas,
Michael's,
personal,
project,
re-purpose,
Really Reasonable Ribbon,
Sizzix
Tuesday, September 6, 2016
Purple Wall Hanging for Word Art Wednesday
Coffee of the Day - Salted Caramel
Well, once again I am late getting my post up for the Word Art Wednesday challenge. so very sorry about that. I'm sure they are happy that my guest designer time is up with them. I've not been a very good guest since my last 2 posts were late on my blog. at least I had the projects finished on time. :)
for my final project I decided to make a wall hanging with the beautiful scripture that they provide. you can find it on their blog. I added a lovely piece of vintage art from Create with TLC and printed it all out on a piece of watercolor paper. I do apologize for the rubbish photo. it was hard to capture all of the shine from the sparkle of the paints with the glare from my lights. I am terrible at photo editing, as you can tell.
I used gelatos as well as ink refills to color the background. this was adhered to a chipboard piece that was painted with acrylic paints and distressed. various ribbon & trims were added, in addition to sequins plus a bit of rubber stamping. you know I had to add a vintage button! it's a gorgeous mother of pearl button, too.
I gave this to Tyler's girlfriend at the end of summer so she could either have it in her room at home or take it with her to school. she ended up hanging it in her new apartment at school.
I do apologize for not being around. still fighting the migraines and seizures. I really hope they go away soon so I can get back to crafting. I have another post to share in the next few days with all of you. thank you for your patience! :)
love to all of you and enjoy your week!
Jennifer
Challenges:
Crafty Sentiments - anything goes
Fairy Tale Ch - make a decoration
Creative Moments - Anything Goes w/wedding or anniversary twist
Sunny Day - anything goes
TTCRD - anything goes
Kraftin' Kimmie Wonderful Wed - anything goes
Craft-Dee Bow-Z - anything goes with a handmade bow
Craft Your Passion - anything goes
Ooh La La - girly
Ecletic Ellapu - gifts (wall hanging I gave to my son's girlfriend)
Creative Fingers - anything goes
ATG with TLC - anything goes with a Create with TLC digi
Well, once again I am late getting my post up for the Word Art Wednesday challenge. so very sorry about that. I'm sure they are happy that my guest designer time is up with them. I've not been a very good guest since my last 2 posts were late on my blog. at least I had the projects finished on time. :)
for my final project I decided to make a wall hanging with the beautiful scripture that they provide. you can find it on their blog. I added a lovely piece of vintage art from Create with TLC and printed it all out on a piece of watercolor paper. I do apologize for the rubbish photo. it was hard to capture all of the shine from the sparkle of the paints with the glare from my lights. I am terrible at photo editing, as you can tell.
I used gelatos as well as ink refills to color the background. this was adhered to a chipboard piece that was painted with acrylic paints and distressed. various ribbon & trims were added, in addition to sequins plus a bit of rubber stamping. you know I had to add a vintage button! it's a gorgeous mother of pearl button, too.
I gave this to Tyler's girlfriend at the end of summer so she could either have it in her room at home or take it with her to school. she ended up hanging it in her new apartment at school.
I do apologize for not being around. still fighting the migraines and seizures. I really hope they go away soon so I can get back to crafting. I have another post to share in the next few days with all of you. thank you for your patience! :)
love to all of you and enjoy your week!
Jennifer
Challenges:
Crafty Sentiments - anything goes
Fairy Tale Ch - make a decoration
Creative Moments - Anything Goes w/wedding or anniversary twist
Sunny Day - anything goes
TTCRD - anything goes
Kraftin' Kimmie Wonderful Wed - anything goes
Craft-Dee Bow-Z - anything goes with a handmade bow
Craft Your Passion - anything goes
Ooh La La - girly
Ecletic Ellapu - gifts (wall hanging I gave to my son's girlfriend)
Creative Fingers - anything goes
ATG with TLC - anything goes with a Create with TLC digi
Labels:
gelatos,
guest designer,
project,
sequins,
TLC,
Word Art Wednesday
Monday, July 25, 2016
A Simple Magnet of Encouragement
Coffee of the Day - Creme Brulee
Sometimes we all have rough days, and yesterday was one of those for me. I just needed a bit of crafty time, so I put together a simple magnet to either place on my refrigerator or card stock credenza to remind me that better days are ahead. it was the perfect little thing to add to the Bugaboo 'Anything but a Card' post for their inspiration and challenge blog.
I used the pretty 'Frame It - Meant to Be' image and re-purposed a microwave popcorn box for the backing. 2 pieces were die cut with the SU! Top Note die, painted, and then distressed with inks. magnetic strips were added to the back. shimmerz paint was added to several words of the main image and glitter pen accents to the butterfly trails. ribbon snippets are from Really Reasonable Ribbon and the chrysanthemum is from Wild Orchid Crafts.
sorry for the horrid photo. it really was the best of the ones I took. my tremors are getting pretty bad these days and I just flat out can't see well either. my sight is going, which is part of the reason for the yuck day. oh well. trying to stay focused on the many blessings in my life. :)
I'll be back in just a bit with my challenge project for The Digi Bells. hope to see you then!
Challenges:
Not Just Cards - color challenge
Scribbles Designs - how does your garden grow?
Colour Crazy - anything goes (watercolor brushes and SU! inks)
Through the Purple Haze - peaceful/harmony
Allsorts - anything but a card (magnet)
Sometimes we all have rough days, and yesterday was one of those for me. I just needed a bit of crafty time, so I put together a simple magnet to either place on my refrigerator or card stock credenza to remind me that better days are ahead. it was the perfect little thing to add to the Bugaboo 'Anything but a Card' post for their inspiration and challenge blog.
I used the pretty 'Frame It - Meant to Be' image and re-purposed a microwave popcorn box for the backing. 2 pieces were die cut with the SU! Top Note die, painted, and then distressed with inks. magnetic strips were added to the back. shimmerz paint was added to several words of the main image and glitter pen accents to the butterfly trails. ribbon snippets are from Really Reasonable Ribbon and the chrysanthemum is from Wild Orchid Crafts.
sorry for the horrid photo. it really was the best of the ones I took. my tremors are getting pretty bad these days and I just flat out can't see well either. my sight is going, which is part of the reason for the yuck day. oh well. trying to stay focused on the many blessings in my life. :)
I'll be back in just a bit with my challenge project for The Digi Bells. hope to see you then!
Challenges:
Not Just Cards - color challenge
Scribbles Designs - how does your garden grow?
Colour Crazy - anything goes (watercolor brushes and SU! inks)
Through the Purple Haze - peaceful/harmony
Allsorts - anything but a card (magnet)
Monday, May 30, 2016
Memorial Day Treat Bag with Bugaboo
Coffee of the Day - Maple Fudge
It's Memorial Day and I have a cute little project to share with all of you today! for 'Anything But a Card' over on the Bugaboo challenge and inspiration blog, I wanted to make a little something for my son who is off doing his summer internship. as a mom missing one of the birds in her nest, it's all about sending lots of care packages! :)
when looking through the Bugaboo store, I fell in love with the Edward USA image. I created my own star stencil using punches for the grey chevron bag. a quick spray of glimmer mist, papers from the Authentique Glory collection (they truly have the BEST patriotic papers!!!), glory blue seam binding (distressed) a re-purposed postage stamp, and this bag was ready to be filled with some goodies! hubby helped pick out the red, white, and blue treats plus a few sparklers for fun! shimmerz paint and a spica clear glitter gel pen add shiny accents to the main image.
while my project is fun and light hearted, we do pause to remember those who have given their lives as the greatest sacrifice for the freedoms we so cherish here in our country. I am thankful to them for their honor and bravery.
thank you so much for your continued kindness each time you stop by! it means so much to me! :)
Challenges:
Decorate to Celebrate - anything goes
Crafting From the Heart - anything goes
Eureka - anything goes
613 Avenue Create - anything goes
Pile it On - tic tac toe (stripes, die cut, bird)
Crafting with Dragonflies - animals
Jo's Scrap Shack - anything goes
Simply Create Too - red, white, and blue
It's Memorial Day and I have a cute little project to share with all of you today! for 'Anything But a Card' over on the Bugaboo challenge and inspiration blog, I wanted to make a little something for my son who is off doing his summer internship. as a mom missing one of the birds in her nest, it's all about sending lots of care packages! :)
**the watermark I've been given by Bugaboo is the little lady in the car.
it is NOT part of the card.**
when looking through the Bugaboo store, I fell in love with the Edward USA image. I created my own star stencil using punches for the grey chevron bag. a quick spray of glimmer mist, papers from the Authentique Glory collection (they truly have the BEST patriotic papers!!!), glory blue seam binding (distressed) a re-purposed postage stamp, and this bag was ready to be filled with some goodies! hubby helped pick out the red, white, and blue treats plus a few sparklers for fun! shimmerz paint and a spica clear glitter gel pen add shiny accents to the main image.
while my project is fun and light hearted, we do pause to remember those who have given their lives as the greatest sacrifice for the freedoms we so cherish here in our country. I am thankful to them for their honor and bravery.
thank you so much for your continued kindness each time you stop by! it means so much to me! :)
Challenges:
Decorate to Celebrate - anything goes
Crafting From the Heart - anything goes
Eureka - anything goes
613 Avenue Create - anything goes
Pile it On - tic tac toe (stripes, die cut, bird)
Crafting with Dragonflies - animals
Jo's Scrap Shack - anything goes
Simply Create Too - red, white, and blue
Friday, May 13, 2016
Memorial Day Bingo Card Wall Hanging
Coffee of the Day - Coconut
Hello and welcome to my stop on the Really Reasonable Ribbon blog hop! you should have come here by way of GINNY'S gorgeous blog! that lady sure has some talent, doesn't she?! :)
if you ever get lost while hopping along, stop by the RRR blog for a complete list. and be sure to stop there when you finish the hop so you can enter the contest for a chance to win your very own monthly ribbon kit!
when I saw this gorgeous collection of patriotic themed ribbons, I knew immediately that I wanted to create something for Memorial Day. I also knew I wanted something other than a card, so I looked through some of the vintage goodies hubby and I had picked up while out on our antique adventures. I saw the bingo cards and thought, 'Bingo!' tee hee!
I used a wonderful Memorial Day vintage image from Create with TLC in addition to several of the ribbons from the monthly kit. star ribbon was distressed with ink to give that shabby look I love!
bark stars are from Live and Love Crafts. doily was sprayed with glimmer mist. buttons are all from my vintage stash. mulberry flowers include chrysanthemums, apple blossoms, open roses, tea rose, and a little bead berry spray.
if you want to see more detail on the photo, just click on the picture. it will take you to another window. :)
now grab a refill of coffee and head on over to CHERYL'S most amazing blog! be sure to leave her a comment letting her know how much you enjoy the project she has made to inspire you. :)
Challenges:
Craft for the Craic - a step back in time
Creative Fingers - anything goes
Creative Corner - Let's Celebrate
PDE linky party - anything goes
Southern Girls - anything goes
Decorate to Celebrate - anything goes
TTCRD - anything goes
Craft-Dee BowZ - anything goes with a handmade bow
Not Just Cards - anything goes
Classic DT - anything for a DT
Hello and welcome to my stop on the Really Reasonable Ribbon blog hop! you should have come here by way of GINNY'S gorgeous blog! that lady sure has some talent, doesn't she?! :)
if you ever get lost while hopping along, stop by the RRR blog for a complete list. and be sure to stop there when you finish the hop so you can enter the contest for a chance to win your very own monthly ribbon kit!
when I saw this gorgeous collection of patriotic themed ribbons, I knew immediately that I wanted to create something for Memorial Day. I also knew I wanted something other than a card, so I looked through some of the vintage goodies hubby and I had picked up while out on our antique adventures. I saw the bingo cards and thought, 'Bingo!' tee hee!
I used a wonderful Memorial Day vintage image from Create with TLC in addition to several of the ribbons from the monthly kit. star ribbon was distressed with ink to give that shabby look I love!
bark stars are from Live and Love Crafts. doily was sprayed with glimmer mist. buttons are all from my vintage stash. mulberry flowers include chrysanthemums, apple blossoms, open roses, tea rose, and a little bead berry spray.
if you want to see more detail on the photo, just click on the picture. it will take you to another window. :)
now grab a refill of coffee and head on over to CHERYL'S most amazing blog! be sure to leave her a comment letting her know how much you enjoy the project she has made to inspire you. :)
Challenges:
Craft for the Craic - a step back in time
Creative Fingers - anything goes
Creative Corner - Let's Celebrate
PDE linky party - anything goes
Southern Girls - anything goes
Decorate to Celebrate - anything goes
TTCRD - anything goes
Craft-Dee BowZ - anything goes with a handmade bow
Not Just Cards - anything goes
Classic DT - anything for a DT
Labels:
blog hop,
Live and Love Crafts,
project,
Really Reasonable Ribbon,
TLC,
vintage
Friday, May 6, 2016
A Pretty Little Pink Purse
Top 3 Pick at Scrapper's Delight
Coffee of the Day - Vanilla Macadamia
Our neighbor is expecting her 2nd child within the next week or so, and I wanted to make a little giftie for her daughter. She is just the cutest little girl and really loved to say hello to Mocha whenever we were all outside together. :)
This 'Lipstick' image was given as part of the Progressive Challenge over in the Scrapper's Delight Facebook group, so I thought it would be fun on a cute little paper purse.
a little doily smidgen, several shades of glimmer mist sprayed on the card stock, spot of vintage lace, WOC cosmos, a big bright button to hold it together (actually a velcro dot hidden under the flap does the trick!), and finally a strap made from hot pink quatrefoil satin ribbon tied in a bow.
we found several flavors of Burt's Bees lip balms to tuck inside. perfect for any 3 year old ready to be 'Big Sister'!!! :)
and she loved it! I was so happy when she kept putting on her 'lipstick' and then looked all over her house for things to put in her new purse! :)
Happy Friday to all of you! enjoy your day!
Challenges:
Craft Your Passion - anything goes
Love to Scrap - make it girly
Not Just Cards - anything goes
In the Pink - for a child/baby
Creative Knock-outs - tic tac toe (digi, distressing, flower)
Through the Purple Haze - anything goes
613 Avenue Create - anything goes or nautical
Jo's Scrap Shack - anything goes
Coffee of the Day - Vanilla Macadamia
Our neighbor is expecting her 2nd child within the next week or so, and I wanted to make a little giftie for her daughter. She is just the cutest little girl and really loved to say hello to Mocha whenever we were all outside together. :)
This 'Lipstick' image was given as part of the Progressive Challenge over in the Scrapper's Delight Facebook group, so I thought it would be fun on a cute little paper purse.
a little doily smidgen, several shades of glimmer mist sprayed on the card stock, spot of vintage lace, WOC cosmos, a big bright button to hold it together (actually a velcro dot hidden under the flap does the trick!), and finally a strap made from hot pink quatrefoil satin ribbon tied in a bow.
we found several flavors of Burt's Bees lip balms to tuck inside. perfect for any 3 year old ready to be 'Big Sister'!!! :)
and she loved it! I was so happy when she kept putting on her 'lipstick' and then looked all over her house for things to put in her new purse! :)
Happy Friday to all of you! enjoy your day!
Challenges:
Craft Your Passion - anything goes
Love to Scrap - make it girly
Not Just Cards - anything goes
In the Pink - for a child/baby
Creative Knock-outs - tic tac toe (digi, distressing, flower)
Through the Purple Haze - anything goes
613 Avenue Create - anything goes or nautical
Jo's Scrap Shack - anything goes
Friday, April 15, 2016
Things with Wings Challenge at RRR
Ooh La La Winner at My Sheri CRAFTS
Color Spotlight Project at Outlawz Color Challenges
Coffee of the Day - Maple Fudge
We have a new challenge over at the Really Reasonable Ribbon blog starting today, and the theme is 'Things with Wings.' I hope you will not only play along with us, but also stop by the blog to see the beautiful projects made by some of my team mates! they are so talented and constantly inspire me with the things they create! :)
Several weeks ago, my hubby and I were out for a walk at Camp. I came across this gorgeous piece of wood and knew it would make a neat piece of art.
the wood was first mod podged to seal it. I added moss and a wonderful piece of rusted and painted chicken wire I came across at Hobby Lobby. tiny sweetheart blossoms by Wild Orchid Crafts were added.
the birds were created from templates I found online and a box that once held microwave popcorn. ;) nothing like re-purposing what's around the house! each bird is several layers thick.
Birds were covered in Prima Anna Lee digital papers, edged in SU! glitter glass and stickles, and then tied with peacock alley & baby pink seam binding. I used vintage buttons for their eyes.
even the little nest is made from ribbons! I used a fabulous tutorial by my creative muse, Melissa Phillips, found here on her blog, Lily Bean Paperie. I used copper forest hand dyed silk, chestnut mini ric rac, and natural burlap string.
I searched and searched the stores for little bird eggs, but couldn't find them anywhere. ended making my own out of modeling clay. think they turned out cute! used my SU! ink squirty tool to add little speckles. of course the nest needed to sit on some branches, so grabbed a few from my yard. 2 cottage roses surround the nest.
just a reminder that if you want to see more detail on any photo, just click the piccy and it will take you to a larger one in a separate page.
this is going to my MIL for her Mother's Day gift. sure hope she likes it! :)
I hope this project inspires you to see art wherever you are and try something new!
enjoy your weekend! :)
Challenges:
A Bit More Time to Craft - anything goes
Outlawz Tues color - color inspiration with nature twist
Altered Eclectics - anything altered/mixed media goes
Happy Little Stampers Mixed Media - wings
Sisters of Craft - anything goes
As You Like It - fave non-card project (found treasures! I like coming across something and seeing what kind of artwork I can turn it into. I also enjoy taking something like the popcorn box and re-purposing it, such as I did with the little birds. recycling at its best!)
Whimsy Inspires - spring colors or Easter
Crafting for All Seasons - tic tac toe: flowers, ribbon, backing paper (Prima, on birds)
A Place to Start - up-cycle a common household item (microwave popcorn box - at least in our house they are commonplace! also buttons)
Crafting From the Heart - anything goes
Critters and Creatures - anything goes with a critter or creature
Not Just Cards - anything goes
The Crazy Ch - spring is here
My Sheri Crafts - Mother's Day flowers
The Stamping Boutique - flowers
Scrapping 4 Fun - birds
Color Spotlight Project at Outlawz Color Challenges
Coffee of the Day - Maple Fudge
We have a new challenge over at the Really Reasonable Ribbon blog starting today, and the theme is 'Things with Wings.' I hope you will not only play along with us, but also stop by the blog to see the beautiful projects made by some of my team mates! they are so talented and constantly inspire me with the things they create! :)
Several weeks ago, my hubby and I were out for a walk at Camp. I came across this gorgeous piece of wood and knew it would make a neat piece of art.
the wood was first mod podged to seal it. I added moss and a wonderful piece of rusted and painted chicken wire I came across at Hobby Lobby. tiny sweetheart blossoms by Wild Orchid Crafts were added.
the birds were created from templates I found online and a box that once held microwave popcorn. ;) nothing like re-purposing what's around the house! each bird is several layers thick.
Birds were covered in Prima Anna Lee digital papers, edged in SU! glitter glass and stickles, and then tied with peacock alley & baby pink seam binding. I used vintage buttons for their eyes.
even the little nest is made from ribbons! I used a fabulous tutorial by my creative muse, Melissa Phillips, found here on her blog, Lily Bean Paperie. I used copper forest hand dyed silk, chestnut mini ric rac, and natural burlap string.
I searched and searched the stores for little bird eggs, but couldn't find them anywhere. ended making my own out of modeling clay. think they turned out cute! used my SU! ink squirty tool to add little speckles. of course the nest needed to sit on some branches, so grabbed a few from my yard. 2 cottage roses surround the nest.
just a reminder that if you want to see more detail on any photo, just click the piccy and it will take you to a larger one in a separate page.
this is going to my MIL for her Mother's Day gift. sure hope she likes it! :)
I hope this project inspires you to see art wherever you are and try something new!
enjoy your weekend! :)
Challenges:
A Bit More Time to Craft - anything goes
Outlawz Tues color - color inspiration with nature twist
Altered Eclectics - anything altered/mixed media goes
Happy Little Stampers Mixed Media - wings
Sisters of Craft - anything goes
As You Like It - fave non-card project (found treasures! I like coming across something and seeing what kind of artwork I can turn it into. I also enjoy taking something like the popcorn box and re-purposing it, such as I did with the little birds. recycling at its best!)
Whimsy Inspires - spring colors or Easter
Crafting for All Seasons - tic tac toe: flowers, ribbon, backing paper (Prima, on birds)
A Place to Start - up-cycle a common household item (microwave popcorn box - at least in our house they are commonplace! also buttons)
Crafting From the Heart - anything goes
Critters and Creatures - anything goes with a critter or creature
Not Just Cards - anything goes
The Crazy Ch - spring is here
My Sheri Crafts - Mother's Day flowers
The Stamping Boutique - flowers
Scrapping 4 Fun - birds
Wednesday, March 23, 2016
Candy Easter Baskets
Coffee of the Day - Cinnabon (a very nice person sent me this K-cup! so yum!)
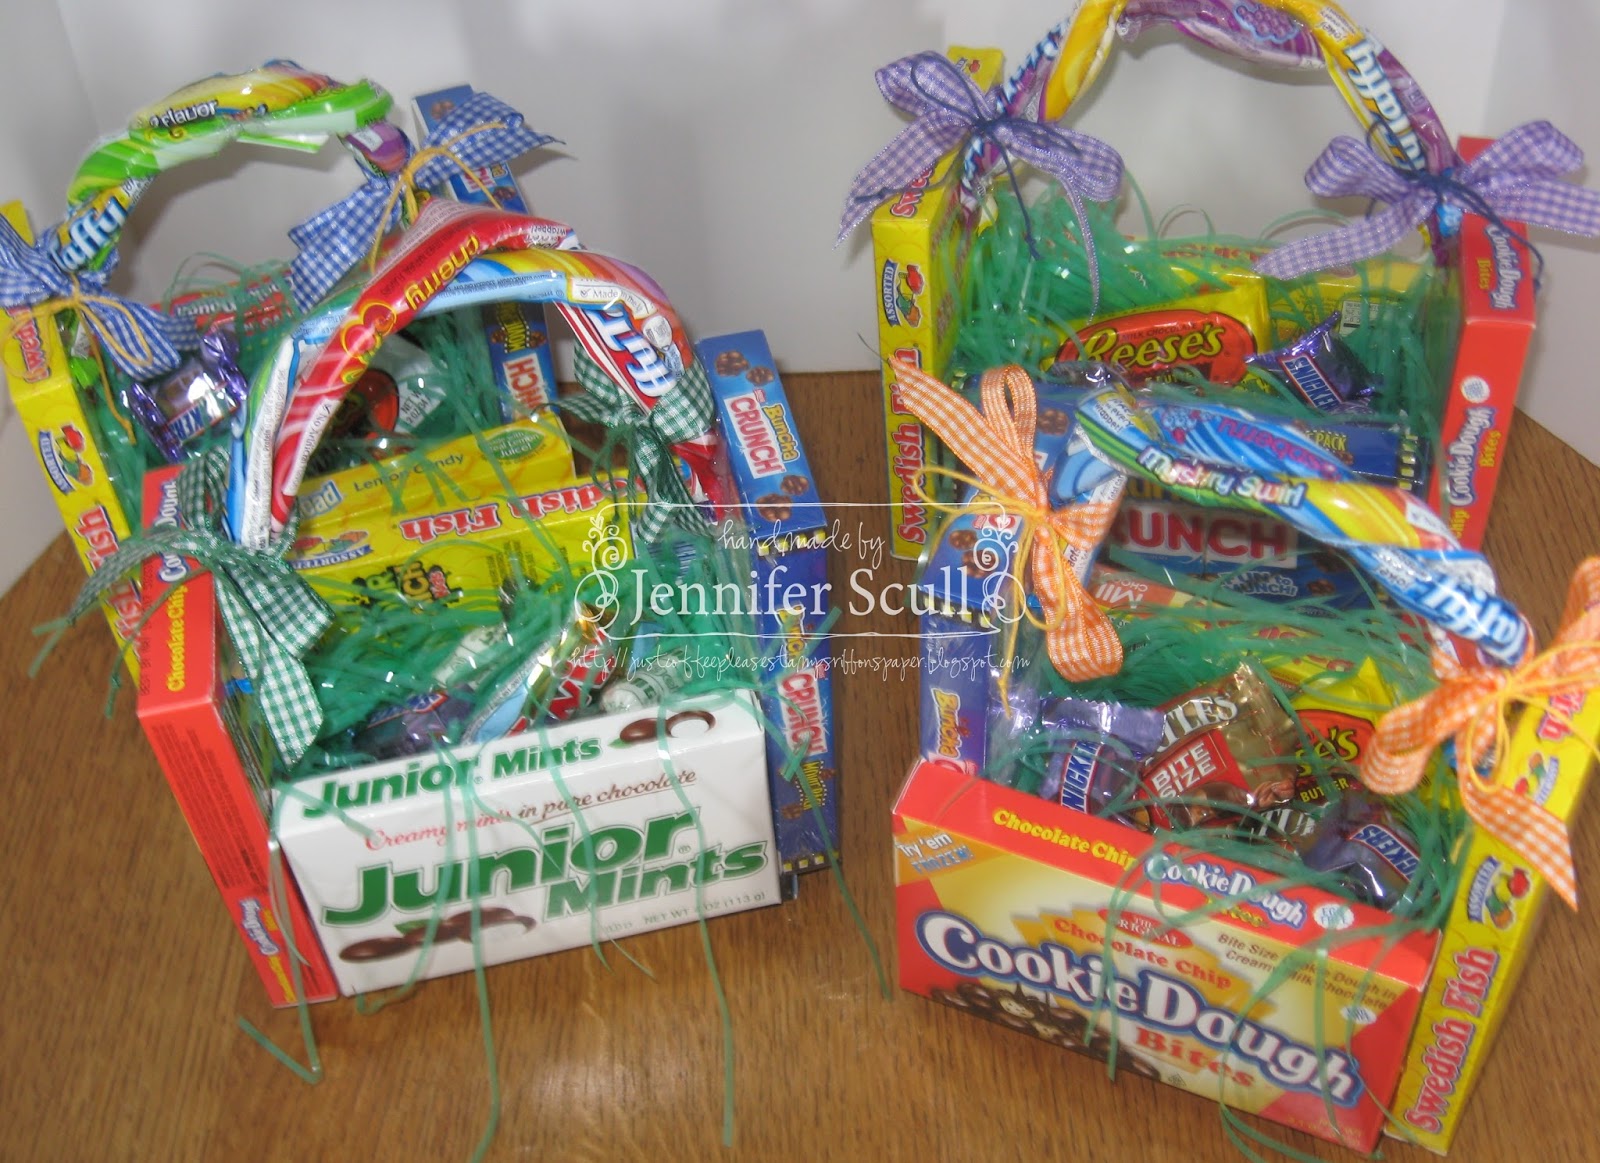
Since all of my kiddos are going to be away for Easter this year, I made a fun type of Easter basket for each of them. I found the idea through a friend's Facebook page and then followed the link to this blog post. my baskets are a modification of these.
Each basket is different and tailored to the recipient. Dave and I had to go to a special candy warehouse on the other side of Cleveland in order to find the laffy taffy ropes. it was about a 1 1/2 hour drive just to get there, but what a cool place! couldn't find the candy ropes in any stores around here, but then we do live in an itty bitty town. I like the ropes braided the way I did them here. :)
Baskets are tied with plaid ribbons and baker's twine from Really Reasonable Ribbon. each one sports the fave colors of the person receiving it.
had to make a basket for Tyler's girlfriend, too. :)
I sure do appreciate you stopping by my blog today! have a great day!
Jennifer
Since all of my kiddos are going to be away for Easter this year, I made a fun type of Easter basket for each of them. I found the idea through a friend's Facebook page and then followed the link to this blog post. my baskets are a modification of these.
Each basket is different and tailored to the recipient. Dave and I had to go to a special candy warehouse on the other side of Cleveland in order to find the laffy taffy ropes. it was about a 1 1/2 hour drive just to get there, but what a cool place! couldn't find the candy ropes in any stores around here, but then we do live in an itty bitty town. I like the ropes braided the way I did them here. :)
Baskets are tied with plaid ribbons and baker's twine from Really Reasonable Ribbon. each one sports the fave colors of the person receiving it.
had to make a basket for Tyler's girlfriend, too. :)
I sure do appreciate you stopping by my blog today! have a great day!
Jennifer
Labels:
Easter,
project,
Really Reasonable Ribbon
Subscribe to:
Posts (Atom)